Network Management
The Network Management menu allows to configure network devices and manage its performance. It shows data on network elements such as device information, image upgrade, license information, network configuration and so on.
This menu has the following sub-menus:
Manage Inventory
The Inventory page provides options used to administer the network devices. It displays all the known network devices for this controller and helps with the mounting of the devices on the domain controller.
Icons located at the top-right of the table are primarily used to mount network devices, monitor operational progress, and for bulk execution.
This page shows the devices that are configured on the domain controller. You can mount/connect or unmount/disconnect the registered devices.
Procedure
In the IP Maestro home page, click Network Management > Inventory.
The Inventory page is displayed with the following details:
Field | Description |
Host Name | The assigned name or label generated by the system. |
Device | Ipv4 address provided by the user. |
Status | Operational connection status. The possible values are: • Connected • Unable to connect • Connecting • Unknown • Rebooting |
Telemetry | Monitoring type configured for the device. The possible values are: • Restconf - Data is polled using RESTCONF • gNMI - Data is streamed from the device • Disabled - Monitoring is turned off for the device Hover over the Telemetry type to learn about the status. |
Groups | Group in which the device is located. |
Location | Physical location of the device. |
Vendor | Hardware provider name. |
Platform | Operating system or management software on the device. |
License | License type. |
Image | Installed image details. |
Action | A set of actions that can be performed on each device, explained further in the chapter. |
In case of an error, an icon is displayed to the left of the device row. Click the icon to view the error description.
Mount a device
You can mount one or many devices on the domain controller. Each network device is known as a mount point and each mount point must be configured and registered to the controller.
Prerequisites
• Ensure that the device exists in the network.
• The Management IP must be reachable.
Procedure
1. Click the  icon at the top right.
icon at the top right.2. In the Device Mount dialog box, add the required details in the following fields:
Field | Description |
Device | The registered device to be updated. |
Username | The username used to gain access to the device. |
Password | Password used to gain access to the device. |
Port | Secure Shell (SSH) access port |
Monitoring Type | The monitoring type to be enabled on the device. • Restconf: To monitor using RESTCONF monitoring capabilities • Telemetry: To monitor using Streaming Telemetry capabilities |
Location | Physical location of the device. • Site: The site where the device is located • Rack: The rack where the device is installed |
Note: When the IP Maestro server is upgraded using the steps mentioned in Upgrade IP Maestro section in the Installation guide, the monitoring is defaulted to RESTCONF.
3. In the Device Mount dialog box, click the  icon to define the device groups.
icon to define the device groups. 4. In the Device Groups dialog box, add the required details in the following fields:
Field | Description |
Group name | A user-defined name or label used to group devices. |
Owner (username) | Originator and/or owner of the group. |
Notes | Description of the group purpose. |
5. Click Save.
6. In the Device Mount dialog box, click Mount to confirm mounting of the de vice.
The configuration of the new device is initialized and the status is displayed on the Inventory page.
You can click the  icon to check the current status of the mounted devices.
icon to check the current status of the mounted devices.Discover a Device
You can discover and mount several devices on the Inventory page by specifying the start range and the end range of the device IPs.
Prerequisites
• The device exists in the network.
• The Management IP is reachable.
Procedure
1. On the Inventory page, click the  icon.
icon.
icon.2. In the Device Discovery dialog box, add the required details in the following fields:
Field | Description |
Device Range | |
Start | The IPv4 address to begin the search with. |
End | The IPv4 address to conclude the search. Note: The ending address must be within the same subnet (network ID). |
Username | The username to gain access to the device. |
Password | The password to gain access to the device. |
Port | The port number of the device. |
3. Click Discover to display the list of the devices within the specified range.
4. In the list of devices that are displayed, select the ones to mount, and click Mount to add the devices to the Inventory page.
The selected devices are mounted on the Inventory page.
Note: You can also add and assign groups to individual discovered devices using row level actions before mounting devices.
Unmount a Device
You can unmount one or many devices that are mounted.
Prerequisites
The device(s) must be mounted.
Procedure
1. Click the check-box on the device rows you want to unmount and click the  icon.
icon.
icon.2. In the Confirmation dialog box, click Yes.
Import Device Details
You can import the Comma Separated Value (CSV) files to the Inventory page. The Import and Export features allow you to save and restore your registered devices. This feature also allows offline customization through custom imports of CSV file.
Prerequisites
• Ensure that the device already exists and is configured on the domain controller.
• All devices mentioned in the CSV files are reachable.
Procedure
1. On the Inventory page, click the  icon icon.
icon icon.2. In the Import Data dialog box, click +Choose.
3. Select the CSV files that you want to import to the Inventory page, and click Mount.
The selected CSV files are imported. This feature enables you to configure a large number of devices at once.
Export Device Details
You can export the current device details in a CSV format. The Import and Export features allow you to save and restore your registered devices. This feature also allows offline customization via custom imports. The file is in comma-separated values (CSV) format.
Prerequisite
Ensure that the device already exists and is configured on the domain controller.
Procedure
1. On the Inventory page, select the devices that you want to export.
2. Click the  icon.
icon.
icon.The devices’ details are exported as CSV files in Excel format. You can open these CSV files on Notepad for better representation.
Push Configuration for Devices
To ease the process of manual configuration on each single device, there is an option to push configuration on more than one device at a time. This provides accuracy and a reduced risk of encountering configuration errors.
Bulk configurations can be pushed to OcNOS devices in two ways, either in JSON format or CLI text based format.
Procedure
To push configurations for the mounted devices, follow the steps mentioned below:
1. On the Inventory page, select the devices to push JSON configurations.
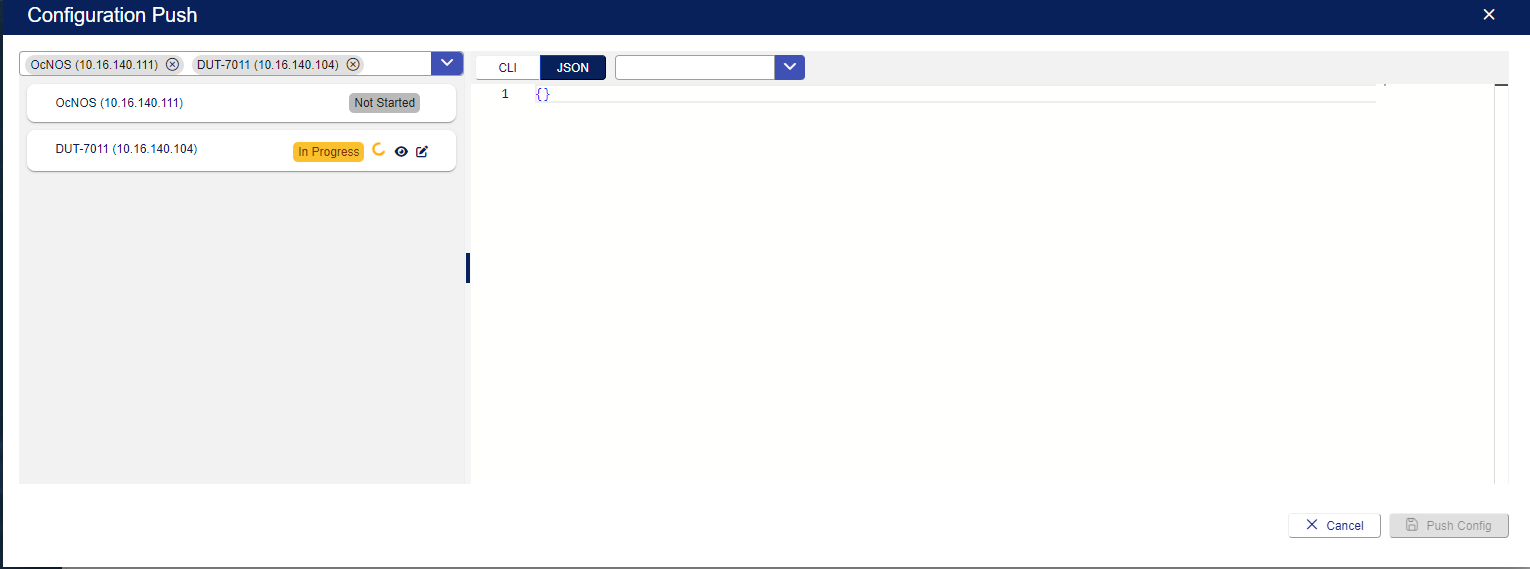
2. Click the  icon. The Configuration Push screen is opened displaying the selected devices on the left. Using the drop-down, you can select more devices on which you want to push configuration.
icon. The Configuration Push screen is opened displaying the selected devices on the left. Using the drop-down, you can select more devices on which you want to push configuration.Note: If no device is selected, a progress panel with the history of configuration push that are performed is displayed.
3. In this screen, you can either select CLI based or JSON based configuration push by clicking the relevant tab on the right panel.
4. Select the Push Now check-box to push the configurations real-time or schedule it for a later date and time using the Time to Execute field.
CLI Text Based Configuration Push
Here is the procedure for text based configuration push:
1. In the Configuration Push screen, click the CLI tab in the main window. The tab changes to blue when activated.
2. In the main text editor window, add the CLI commands to be executed on the selected devices to push configuration. The selected devices are displayed on the left.

3. Click the Push Config button at the bottom to execute the commands.
4. Click Yes at the confirmation message that is displayed. The status of the operation is shown against the device on the screen.
JSON Configuration Push
Here is the procedure for JSON configuration push:
1. In the Configuration Push screen, click the JSON tab in the main window. The tab changes to blue when activated.
In JSON based format, the main window is a JSON formatted sensitive code editor. The initial editor contains an empty payload in the first line denoted by 1 {}.
The code editor implements IntelliSense and validation including basic syntax checking and coloring and the intended payload consists of NETCONF YANG model segments in JSON format.
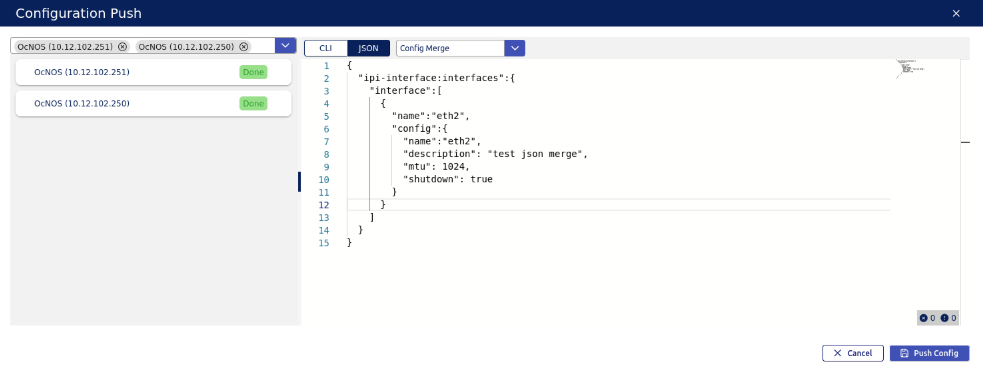
2. In the drop-down, select any of the three push configuration methods - Merge, Replace, or Remove.
Config-Merge
This operation is used to merge configurations by adding new configs or modifying the existing configuration values. It allows the addition or modification of attributes to existing objects. It is added in the JSON editor on selected devices as shown in the image below:
Config-Replace
This operation adds the new configs by deleting the existing configs. You can set a container for which configuration must be replaced and added in JSON editor.
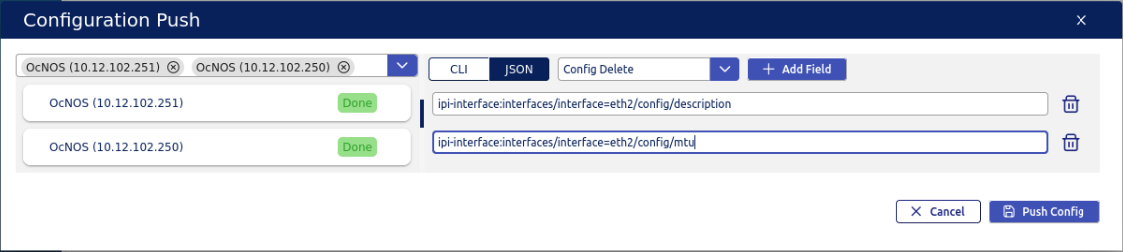
Config-Remove
This operation supports deletion of configurations from selected devices. Enter the path for the Configuration deletion as shown in the image below:
1. Click the Push Config button at the bottom.
2. Click Yes at the confirmation message that is displayed. The status of the operation is shown against the device on the screen.
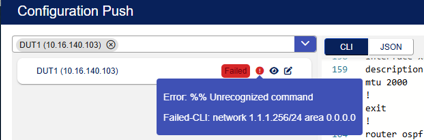
In case of an error, the progress is highlighted in red and the error message is shown by hovering on the status.
Note: HINT: You can use the CLI on a device to help you construct and format a payload using the show json running-config command.
Monitor Operation Progress on Device
You can monitor the progress of various operations such as Image Upgrade, License Installation, Configuration Backup, and Configuration Restore on a device using the  icon at the top right of the table.
icon at the top right of the table.Image Upgrade
Image Upgrade is a feature that supports the upgrade of OcNOS image on a device being managed by IP Maestro. It provides a feature that enables IP Maestro to download and upgrade the software on devices. The images are created and managed externally from IP Maestro and are made available via a published repository. The portal is then used to navigate through the public folder in search of the appropriate image. The user selects the image file for the targeted device. For more information, refer to the section Upgrade New Image.
Install License
Install License is a feature that enables IP Maestro to manage device node licenses. The binary license files are created and managed externally from IP Maestro and are made available via a published repository. The portal is then used to navigate through the public folder in search of the appropriate license. The user selects the license file based on its name, which is the serial number of the targeted device. On selecting the device and license, the portal is used to notify the device as to where the license is located. The device will then retrieve and activate the license. For more information, refer to the section Install License.
Configuration Backup
Configuration Backup is used to back up Device Configuration for a single device or the entire network. A customized data table is used to define and manage the targeted devices.
The managed network devices are configured using YANG modules and each device contains its own modules. The Configuration Backup feature is used to store these device configurations (which can be restored at a later date). When a device is backed up, all the configurations are grouped and assigned a label. The label is then used to restore a specifically labeled backup. For more information, refer to the section Configuration Backup.
Configuration Restore
Configuration Restore is used to back up and restore Device Configuration for a single device or the entire network. A customized data table is used to define and manage the targeted devices.
The managed network devices are configured using YANG modules and each device contains its own modules. This feature is used to replace device configurations that were previously backed up. For more information, refer to the section Configuration Restore.
Upgrade New Image
The image is a binary file that is installed on the OcNOS device. During the upgrade process, the image is first downloaded to the device. The actual installation however is performed according to the scheduled installation time. One or more registered devices can be selected for image upgrade at the same time. This two-step process is executed automatically.
Prerequisite
Ensure that the device already exists and is configured on the domain controller.
Procedure
1. In the IP Maestro home page, navigate to Network Management > Inventory.
2. Click the icon, and then click Image Upgrade to display the image upgrade status and configuration.
icon, and then click Image Upgrade to display the image upgrade status and configuration. The following details are displayed for Image Upgrade Progress:
Field | Description |
Host Name | The assigned name or label generated by the system. |
Device | Ipv4 address provided by the user. |
Status | The status of download operation, such as: • Pending • Scheduled • In-Progress • Failed • Done The status of image operation: • Started |
Operation | Status in response (or notification). It is the current sequence of the two-step process. The operation status can be: • Download • Installation |
Install Time (GMT) | The time scheduled to begin operation. |
Current Version | Software version installed on the device. |
Installed Version | The recently installed software version on the device. |
Image Location | The fully qualified path name of the file. |
Interface | The management interface used for file transfers. |
1. Click the  icon.
icon.
icon.2. In the Image Upgrade dialog box, add the required details in the following fields:
Field | Description |
Device | Registered device to update selected by the user from the dropdown. |
Source Interface | Select an interface on the device used for data transfers (within the management VRF). The default is “eth0” interface. Note: The source interface is used for all selected interfaces. |
Image Selection | |
Published Images | The images that are available and hosted from an Image Repository. Note: The repository is defined in System Management > Preferences. |
User Defined | Free- form field to enter a custom, fully-qualified path and image name. |
Upgrade Now | Toggle to enable the input switch to execute the upgrade. |
Save Configuration | Toggle to copy the configuration to startup-config before the image upgrade. |
Installation Time | Calendar to schedule an update. |
3. Click Apply to save and schedule the image upgrade for all selected devices.
The new image upgrade is configured.
Edit the Image Upgrade Details
You can edit an image that is installed on the device.
Prerequisite
Ensure that the device already exists and is configured on the domain controller.
Procedure
1. On the Inventory page, in the Image Upgrade Progress menu, click the  icon at the end of device row.
icon at the end of device row. 2. In the Image Upgrade dialog box, add the required details in the following fields:
Field | Description |
Device | Registered device to update from the dropdown. |
Source Interface | Select an interface on the device used for data transfers (within the management VRF). The default is “eth0” interface. Note: The source interface is used for all selected interfaces |
Image Selection | |
Published Images | The images that are available and hosted from an Image Repository. Note: The repository is defined in System Management > Preferences. |
User Defined | Free- form field to enter a custom, fully-qualified path and image name. |
Upgrade Now | Toggle to enable the input switch to execute the upgrade. |
Save Configuration | Toggle this to copy the configuration to startup-config before the image upgrade. |
Installation Time | Calendar to schedule an update. |
3. Click Apply to save and schedule image upgrade for all selected devices.
The image upgrade is edited.
Upgrade Image for all Selected Devices
You can perform bulk upgrade of images for selected devices.
Prerequisite
Ensure that the device already exists and is configured on the domain controller.
Procedure
1. In the IP Maestro home page, navigate to Network Management > Inventory.
2. Click the icon, and then click Image Upgrade to display the image upgrade status.
icon, and then click Image Upgrade to display the image upgrade status. 3. In the Image Upgrade Progress panel, select the devices and click the  icon.
icon.
icon. 4. In the Image Upgrade dialog box, add the required details in the following fields:
Field | Description |
Device | Registered device to update selected by the user from the drop-down. |
Source Interface | Select an interface on the device used for data transfers (within the management VRF). The default is “eth0” interface. Note: The source interface is used for all selected interfaces. |
Image Selection | |
Published Images | The images that are available and hosted from an Image Repository. Note: The repository is defined in System Management > Preferences. |
User Defined | Free- form field to enter a custom, fully-qualified path and image name. |
Upgrade Now | Toggle to enable the input switch to execute the upgrade. |
Save Configuration | Toggle to copy the configuration to startup-config before the image upgrade. |
Installation Time | Calendar to schedule an update. |
5. Click Apply to save and schedule the image upgrade for all selected devices.
The image upgrade is configured for the selected device(s)
Import the Image Upgrade Details
You can import the CSV files to the Image Upgrade page. The Import and Export features allow you to save and restore your upgraded images. This feature also allows offline customization via custom imports. This file format is comma-separated values (CSV).
Prerequisites
• The device already exists and is configured on the domain controller.
• All devices mentioned in the CSV files are reachable.
Procedure
1. On the Inventory > Image Upgrade page, in the Image Upgrade Progress menu, click the Import  icon.
icon.
icon.2. In the Import Data dialog box, click +Choose to select the CSV files that you want to import.
3. Click Upgrade.
The selected CSV files are imported on the Image Upgrade Progress menu. This enables you to configure a large number of images at once.
Export the Image Upgrade Details
You can export the current device details in a CSV format. The Import and Export features allow you to save and restore your upgraded images. This feature also allows offline customization via custom imports. This file format is CSV.
Prerequisite
Ensure that the device already exists and is configured on the domain controller.
Procedure
1. On the Inventory > Image Upgrade page, in the Image Upgrade Progress menu, select the devices for which you want to export the images.
2. Click the Export  icon.
icon.
icon.The devices’ details are exported as CSV files in Excel format. You can open these CSV files in Notepad for a better representation.
Delete the Image Upgrade Details
To cancel the scheduled image upgrade for all selected devices, you must delete the details from the Image Upgrade page.
Prerequisite
The image upgrade details are applied on the mounted devices.
Procedure
1. In the Image Upgrade Progress menu, select the device row(s) to delete the image.
2. Click Delete at the bottom right.
The scheduled image upgrade gets canceled for all the selected devices.
Install License
To install license on a selected device, follow the steps mentioned below:
Prerequisites
• The devices are already mounted and registered on the domain controller.
• Licenses are externally available via a public URL.
Procedure
1. In the IP Maestro home page, navigate to Network Management > Inventory.
2. Click the icon, and then click Install License to display the image upgrade status and configuration.
icon, and then click Install License to display the image upgrade status and configuration. Alternatively, select the device row, click the Action icon, and click Operations > Install License. The License Install dialog box is displayed.
3. Enter the appropriate information as follows:
Field | Description |
Device | Registered device to update. |
Source Interface | Select an interface on the device used for data transfers (within the management VRF). The default is “eth0” interface. Note: The source interface is used for all selected interfaces. |
License Selection | |
Published Licenses | Licenses available and hosted from a License Repository. The repository is defined in System Management > Preferences. |
User Defined | Free-form field to enter a custom fully-qualified path and name of license. |
Device ID | Registered device to update. |
4. Click Apply to apply and save the changes.
Alternatively, to install license on bulk devices at a time, follow these steps:
1. Select the check boxes on the device rows for bulk install and click the icon.
icon. 2. Click Install License to display the License Install dialog box.
3. Enter the appropriate information as follows:
Field | Description |
Device | Registered device to update. |
Source Interface | Select an interface on the device used for data transfers (within the management VRF). The default is “eth0” interface. Note: The source interface is used for all selected interfaces. |
License Selection | |
Published Licenses | Licenses available and hosted from a License Repository. The repository is defined in System Management > Preferences. |
User Defined | Free-form field to enter a custom fully-qualified path and name of license. |
Device ID | Registered device to update. |
Edit License
To edit an available license, follow the steps mentioned below:
Prerequisites
• The devices are already mounted and registered on the domain controller.
• Licenses are externally available via a public URL.
Procedure
1. In the IP Maestro home page, navigate to Network Management > Inventory.
2. Click the icon and click Install License to display the license status and configuration.
icon and click Install License to display the license status and configuration. 3. The Inventory page is displayed with the following details under the License Installation Progress menu:
Field | Description |
Host Name | Assigned name or label generated by the system. |
Device | Ipv4 address provided by the user. |
Status | Operational status of the device. |
Device ID | Serial number of the device. |
Device SKU | Software capabilities installed on the device. |
Software Type | License type of the device. |
License Validity | License status of the device. |
Interface | Management interface used for file transfers. |
License Path | Fully qualified path name of the file. |
4. Click the  icon at the end of the device row.
icon at the end of the device row.5. In the License Install dialog box, add the required details in the following fields:
Field | Description |
Device | Registered device to update. |
Source Interface | Select an interface on the device used for data transfers (within the management VRF). The default is “eth0” interface. Note: The source interface is used for all selected interfaces. |
License Selection | |
Published Licenses | Licenses available and hosted from a License Repository. The repository is defined in System Management > Preferences. |
User Defined | Free-form field to enter a custom fully-qualified path and name of license. |
Device ID | Registered device to update. |
6. Click Apply to copy and save the license on the device.
Configuration Backup
Configuration Backup can be used to back up Device Configuration for a single device or the entire network. It is used to store the device configurations to be restored at a later date. When a device is backed up, all the configurations are grouped and assigned a label. The label is then used to restore a specifically labeled backup.
To define an immediate backup, click the Action icon to the right of the device row and click Operations > Configuration Backup. The Configuration Backup dialog box is displayed. Enter the appropriate information as follows:
Field | Description |
Device | The device to backup. |
Backup Label | A user-defined label to identify the configuration. |
Prerequisites
Ensure that the devices are already mounted and registered on the domain controller.
Procedure
1. In the IP Maestro home page, navigate to Network Management > Inventory.
2. Click the icon and click Configuration Backup to display the backup status and configuration.
icon and click Configuration Backup to display the backup status and configuration. The Configuration Backup Progress menu is displayed with the following information:
Field | Description |
Host Name | The Host name or Label. |
Device | The device to backup. |
Status | Displays the status of the operation. The possible values are: • Pending • Scheduled • In-Progress • Failed • Done |
Start Time | Date and time provided by the date-time picker. |
Label | The name assigned to the host. The label is N/A if the type is network. |
1. Click the icon.
icon.2. In the New Configuration Backup dialog box, add the required details in the following fields:
Field | Description |
Device | The device to back up. |
Backup Label | A user-defined label to identify the configuration. |
3. Click Apply to apply and save the changes on the device.
The new backup is configured.
Create/Update Schedule for Backup of Registered Devices
You can schedule a backup of the registered devices.
Prerequisites
• The devices are already mounted and registered on the domain controller.
Procedure
1. In the Configuration Backup Progress menu, click the Create/Update schedule for backup of registered devices  icon.
icon.
icon.2. The Save Backup Schedule dialog box is displayed. Add the required details in the following fields:
Field | Description |
Start Time | Use the calendar to schedule a backup. |
Recurring | The frequency to schedule a backup. The possible values are: • Daily • Weekly • Monthly |
3. Toggle the Active  icon to schedule the backup. The
  icon changes to green color indicating the “Active” status
icon to schedule the backup. The icon changes to green color indicating the “Active” statusNote: If there is an active schedule for any of the devices, the status line will display a green status  icon.
icon.
icon. 4. Click Save.
The new schedule is updated.
View Backup History and Formatted Configuration
You can view the backup history and the formatted configuration of the already configured and created backup and backup schedules.
Prerequisites
• The devices are already mounted and registered on the domain controller.
Procedure
1. In the Configuration Backup Progress menu, click the icon under the Action menu.
The Backup History page is displayed showing the Label, Backup Time and Backup Size of the already configured backup schedules.
2. Click the  icon to view the configuration details of the specific module.
icon to view the configuration details of the specific module.Compare Configuration
The comparing configuration process allows you to compare the configurations of the backup labels of selected modules.
Prerequisites
• The devices are already mounted and registered on the domain controller.
Procedure
1. Under the Configuration Backup Progress menu, click under the Action menu.
The Compare Configuration page is displayed.
2. Select the backup labels from the drop-down to compare their configurations.
Configuration Restore
Configuration Restore can be used to back up and restore images for a single device or the entire network.
Note: When a device is restored, the previous configuration is removed and replaced with the new set of configurations.
To define a restore, in the Inventory screen, click the Action  icon to the right of the device row and click Operations > Configuration Restore. In the Configuration Restore dialog box that is displayed, enter the appropriate information as follows:
icon to the right of the device row and click Operations > Configuration Restore. In the Configuration Restore dialog box that is displayed, enter the appropriate information as follows:Field | Description |
Device | Registered device to update selected by the user from the drop-down. |
Archive | The available labels to restore. |
Click Apply to apply the changes.
Prerequisites
• The devices are mounted and registered on the domain controller.
Procedure
1. In the IP Maestro home page, navigate to Network Management > Inventory.
2. Click the icon, and then click Configuration Restore to display the restore status and configuration.
icon, and then click Configuration Restore to display the restore status and configuration. The Inventory page is displayed with the following details under the Configuration Restore Progress menu:
Field | Description |
Host Name | The assigned name or label generated by the system. |
Device | The host IP address. |
Status | Displays the status of the operation. The possible values are: • Pending • Scheduled • In-Progress • Failed • Done |
Start Time | Date and time provided by the date-time picker. |
Label | The name assigned to the host. The label is N/A if the type is network. |
3. Click the icon.
icon.4. In the New Configuration Restore dialog, add the required details in the following fields:
Field | Description |
Device | Registered device to update. |
Archive | The available labels to restore. |
5. Click Apply to apply and save the changes.
The new restore is configured.
Device Level Actions
In the Inventory home page, every device row contains the icon to the right which enables the following actions, if appropriate:
icon to the right which enables the following actions, if appropriate: Field | Description |
Device information | Contains the basic information about the device such as operational status, port speed, fan, temperature, power, transceiver details etc. |
Interfaces | Interface details of the device. It contains details on the assigned name, unique identifier, state of the interface, L2 VLAN members, error descriptions, and so on. |
Operations • Unmount Device • Image Upgrade • Install License • Configuration Backup • Configuration Restore • Configuration Push • Device Groups • Device Location • Switch Telemetry | • To unmount the device • To add a published or user defined image • To install published or user defined license • To apply backup for the device • To apply configuration restore using the available labels on the device • To push bulk configurations to OcNOS devices • To assign the device to a group • To specify the physical location of the device • To switch the monitoring type from Restconf to gNMI or vice-versa. You can also turn off monitoring for the device using the Disable option. |
Monitoring • Device Metric • Chassis Monitoring • Interface Statistics • Device Logs | • Allows to monitor the resources for the device • Visualization of the hardware metrics for the device • Visualization of the interface for the device • Displays the device log details. |
Troubleshooting • Device Terminal Access • Generate Tech Support | • Allows to manage Device Terminal Access • Allows to generate Tech Support files |
View Topology
This menu is used to represent a topology view of the network based on the Link Layer Discovery Protocol (LLDP). The map consists of nodes and edges, where each node represents a managed or unmanaged network device and shows connections between each node using bidirectional links.
The devices that are configured can be viewed in the topology. LLDP is a vendor-neutral link layer protocol used by network devices. It is used for advertising their identity, capabilities, and neighbors on a local area network based on IEEE 802 technology, principally, wired Ethernet. The LLDP topology is configured on the domain controller.
The User Interface enables the display of the following types of devices in the topology view:
• Managed - The OcNOS devices that are configured and registered to the controller.
• Unmanaged - Third-party devices that are external and not managed directly by IP Maestro. However, these devices and their connections can be established on the topology view using various nodes.
• Tracked - A combination of managed and unmanaged devices included in the topology.
• All - Displays all managed, unmanaged, and Ghost Devices that are discovered by LLDP but are not managed.
The topology depicts the actual physical network to a large extent. In the topology, various nodes are used to represent managed OcNOS devices and third party devices.
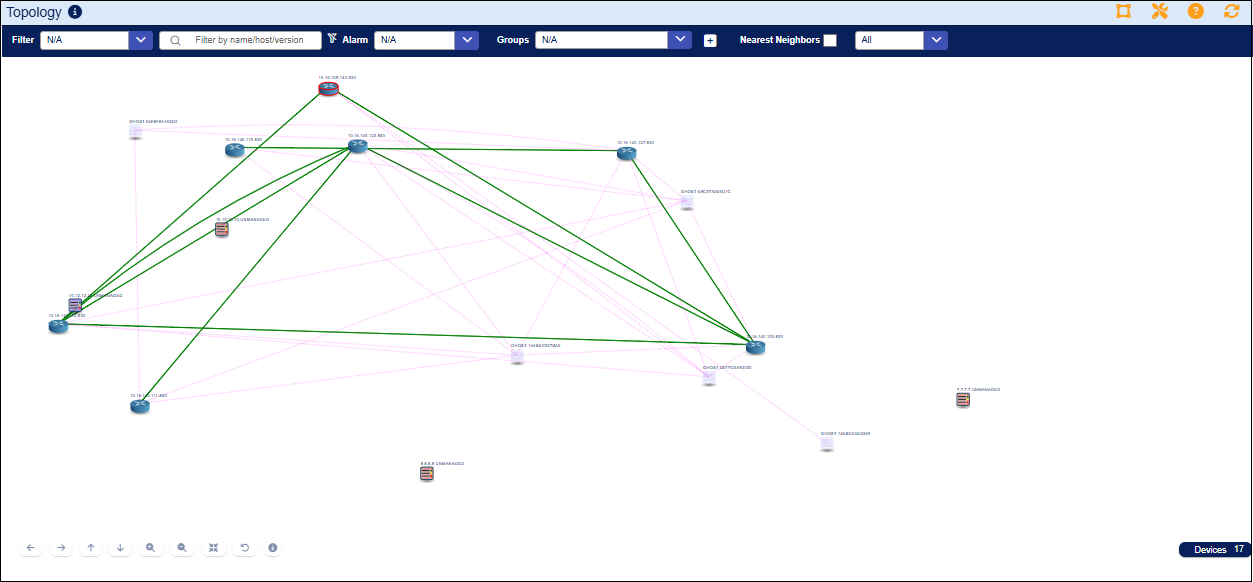 Topology View
The following list describes some of the key features and functionalities:
Field | Description |
Toolbar at the top right | |
 | Displays device link details on an information panel. |
 | Provides options to customize the graph. |
 | Provides access to User Manual. |
 | Manual topology refresh. |
Toolbar at the bottom | |
 | Moves the topology view to the left. |
 | Moves the topology view to the right. |
 | Moves the topology view up. |
 | Moves the topology view down. |
 | Zoom in. |
 | Zoom out. |
 | Zoom in or zoom out to fit the view. |
 | Returns the view to original. |
 | Shows information on controls and link legend. |
 | Shows device summary on clicking the icon. |
Node mouse events | |
 | Shift-click to show device details. |
| Right-click to show the sub-menu containing device links. |
Node legend | |
 | Normal operation. |
 | Fault detected. |
View Devices on the Topology Menu
The configured devices are shown on the Topology page based on the following inputs:
Prerequisite
Ensure that the configured devices are available and connected.
Procedure
1. In the IP Maestro home page, navigate to Network Management > Topology. The Topology page is displayed with the following options:
Field | Description |
Filter | Filter the topology view based on any the following options: • Host Name • Node ID • Device IP • Software Version Or type the option in the Filter by name/host/version field. |
Clear all filters | Click the icon to clear all the selected filters. |
Alarm | Choose the Alarm type from the following options: • Has alarms • Has no alarms • CRITICAL • MAJOR • MINOR • WARNING |
Groups | Choose if the node belongs to a group or not • In a Group • Not in Group Any group specified in the Device Groups Management is listed here. |
Device Groups Management | Click the  icon to specify the group in which the device is located. icon to specify the group in which the device is located. |
Nearest Neighbors | Click the check-box to view the neighboring nodes |
Choose from the following options to view the specific topology: • Managed • Unmanaged • Tracked • All |
2. Select any node and click the  icon to view the device details. Alternatively, you can hover over the node for a quick look at the device details.
icon to view the device details. Alternatively, you can hover over the node for a quick look at the device details.The following details of the selected device are displayed:
Field | Description |
Details | |
Host Name | Network node name defined for the topology. |
Node ID | Unique identifier for the node. |
Software Version | OcNOS version installed on the device. |
Software Build | Build details of software installed on the device. |
Boot Time | Device boot time. |
Time Zone | Time zone for the device boot time. |
License Type | License type. |
License Status | License status. |
Links | Link Source and Destination details. Double click on the Link Source to view the Interface Statistics. |
Groups | |
Groups | Shows the group for the selected node, if any. |
Create Third-Party Devices
To include a node for a third-party device in the topology, follow the steps mentioned below:
1. In the IP Maestro home page, navigate to Network Management > Topology.
2. Right click on the topology area and select the  option.
option. 3. In the Create User Defined Device dialog box, add the required details in the following fields:
Field | Description |
Device Icon | Select an icon for the user defined device. |
Host Name | Enter the name to be used for the device. |
Device IP | Enter a unique IP address for the device. |
Chassis MAC | Enter a unique chassis MAC for the device. |
Ping Enabled | Select the check-box if the device needs to be pinged periodically to determine if it is reachable. |
Description | Enter a description for the device. |
Groups | Select the group for this device. You can also create a new group using the icon. |
4. Click Save to save the changes. The user defined device is displayed as a node in the topology.
Ghost Devices
The devices on LLDP advertise on the local link frequently and any other unknown devices in the same neighborhood are identified. These ghost devices that are discovered by LLDP are not managed directly by IP Maestro. However, they can be converted to an unmanaged device and included as a node in the topology.
Ghost devices are visible in the topology when All is selected.
To convert ghost devices to unmanaged devices, press Shift and click the device icon. In the dialog that is opened, enter the details as shown in the table in the Create Third-Party Devices section.
Create User-Defined Link
To create a link between any two devices, use Ctrl+Shift and click the source device, drag it to the target device, and release the click. This opens the Create User Defined Link dialog box with the following details:
Field | Description |
Source Device | The device that is selected as the source |
Source Port | The port on the source device |
Target Device | The device that is linked to the source |
Target Port | The port on the target device |
Status | Status of the new link to be created |
Click Save to save the changes.
Customize Nodes and Links of Configured Devices
You can customize nodes and links of the configured devices as follows:
Procedure
1. In the IP Maestro home page, navigate to Network Management > Topology.The Topology page is displayed.
2. Click the  icon, which allows you to customize the Nodes and Links of the configured devices.
icon, which allows you to customize the Nodes and Links of the configured devices.3. Navigate and customize the following details:
• Nodes:
• Show Node Labels: The names of the nodes in the configured devices. The node labels are shown by default.
• Node Label: Sets the node label in topology to Host Name or Node ID.
• Links:
• Link Thickness (px): Drag to set the stroke-width property to define the thickness of the links or edges.
• Curved Lines: Select the checkbox to display links as curved lines.
• Link Curve Size: Drag to adjust the shape of the curved lines.
• Bidirectional links: Select the checkbox to display the bidirectional links.
• Arrow Size: Drag to adjust the size of the arrows.
• Arrow Position: Drag to adjust the position of arrows in the links.
4. Click Reset to restore the changes back to default or click Close to apply the changes.
View the Device-level Dashboards
You can view the dashboards from a device level by right-clicking the configured device in the Topology menu.
Procedure
1. In the IP Maestro home page, navigate to Network Management > Topology.The Topology page is displayed.
2. Right-click the configured device, for which you want to see the device-level information. The following details of the device are displayed:
Field | Description |
Network Management • Inventory • Troubleshooting | • Redirects to the Inventory page for information on the devices’ mount transaction. • Device Terminal Access Redirects to the Device Terminal Access page to gain direct access to a shell on any device on the network using a secure connection. • Device Tech Support Redirects to the Device Tech Support dashboard to generate and download Tech Support file from mounted devices. |
Field | Description |
Network Monitoring • Device Metrics • Chassis Monitoring • Active Alarms • Interface Statistics • Device Logs | • Allows to monitor the resources for the device • Visualization of the hardware metrics for the device • Displays the active alarms for the device. • Visualization of the interface for the device • Displays the device log details. |
You can also double click the node to view the Device Information dashboard.
Troubleshooting
The Troubleshooting menu allows you to gain direct access to the Device Terminal to view the running configuration and also to generate the Tech Support files.
This menu has the following sub-menus:
Manage Device Terminal Access
Terminals are web-based command-line applications to access the devices from which you can directly connect to the OcNOS device over Secure Shell Protocol (SSH). This is a fully-featured terminal emulator that can be used to gain direct access to a shell on any device on the network using an SSH connection.
Prerequisite
Ensure that the configured devices (through the device registration process) are available.
Procedure
1. In the IP Maestro home page, navigate to Network Management > Troubleshooting > Device Terminal Access. The Device Terminal Access page is displayed. Alternatively, you can click the icon at the end of the device row on the Inventory page, and click Troubleshooting > Device Terminal Access.
icon at the end of the device row on the Inventory page, and click Troubleshooting > Device Terminal Access. 2. Click the  icon. This allows you to manage the New Connection and Registered Devices as follows:
icon. This allows you to manage the New Connection and Registered Devices as follows:• New Connection:
• Host: IP Address/hostname for connecting to the terminal over SSH.
• Username: Username for connecting the terminal to a host/device over SSH.
• Registered Devices: Select a host from the drop-down menu.
3. Click Connect to view the running configuration.
The OcNOS device is connected. To terminate a session, type exit in the terminal>_ or just click the Close icon on the terminal tab.
Generate Tech Support Files
You can generate and download tech support files for the selected devices that are mounted.
Prerequisite
Ensure that the devices are mounted and available.
Procedure
1. In the IP Maestro home page, navigate to Network Management > Troubleshooting > Device Tech Support. The Device Tech Support page is displayed. Alternatively, you can click the icon at the end of the device row on the Inventory page, and click Troubleshooting > Device Tech Support.
icon at the end of the device row on the Inventory page, and click Troubleshooting > Device Tech Support.2. In the Device(s) drop-down, select the required devices from the list of mounted devices.
3. Choose the module(s) by clicking the appropriate module filters, as required.
4. Click Query Current Files button to check if there are existing tech support files. The existing files, if any, are listed along with a  icon at the right to download the file.
icon at the right to download the file. 5. Click the Generate button if you wish to generate the files newly or if there are no existing files for the device. Once generated, the file can be downloaded using the icon.
icon. Note: Select the Remove old Tech Support files check-box, if you do not wish to retain the previously generated file(s).