System Management
The System Management menu in the IP Maestro banner serves as a comprehensive tool for overseeing various aspects of the system. It facilitates the management of key components, including the IP Maestro portal, user activity, user accounts, sessions, user preferences, and DHCP & SMTP configuration.
This chapter describes the following sections:
User Management
The User Management page allows you to manage users, sessions, and email preferences relating to user notifications.
This page contains the following tabs:
• Sessions
• Alerts
• Reports
IP Maestro Accounts
The Accounts dashboard allows you to create, read, delete, and update user accounts. You will be able to access the Accounts screen and create multiple users with similar access. You can also create, delete, and update all user profiles. The data of all the users are shown in table format. Multiple users can be created, updated, and deleted by selecting table rows.
Add a New User
The addition process allows you to add new users to the Accounts page.
Prerequisite
You have the permissions/roles to add a new user.
Procedure
1. In the IP Maestro home page, click System Management > User Management.
2. In the IP Maestro Accounts tab, click the  icon.
icon.
icon.3. In the Create new user dialog box, add the following field details:
Field | Description |
Username | The username to authenticate provided by the user. |
First Name | First name of the user. |
Last Name | Last name of the user. |
Password | Provide the credentials for the user to access. |
Role | The user role. The following are the user roles: • IP Maestro Administrator - Complete read and write access to entire system. • IP Maestro Engineer - Read access to entire system. Read and write access to fabric interconnect infrastructure and network security operations. • IP Maestro Operator - Read access to entire system. Read and write access to all the logs. • IP Maestro User - Read only access to the entire system. |
Email | Email address of the user. |
Slack Notification URL | URL to be used for the Slack notification. |
4. Click Create to add the new user.
The new user is added in the IP Maestro Accounts tab.
Edit an Existing User
The editing process allows you to edit existing users on this page.
Prerequisites
• The user is already added to the user accounts.
• You have the permissions/roles to edit an existing user.
Procedure
1. In the IP Maestro home page, click System Management > User Management.
2. In the IP Maestro Accounts tab, select the check-box of the user accounts row to edit the selected users.
3. Click the Edit icon in Action > Edit User for the user that you want to edit or update.
4. Edit the required fields in the dialog box that is displayed:
Field | Description |
Username | The username to authenticate provided by the user. |
First Name | First name of the user. |
Last Name | Last name of the user. |
Password | Provide the credentials for the user to access. |
Role | The user role. The following are the user roles: • IP Maestro Administrator - Complete read and write access to entire system. • IP Maestro Engineer - Read access to entire system. Read and write access to fabric interconnect infrastructure and network security operations. • IP Maestro Operator - Read access to entire system. Read and write access to all the logs. • IP Maestro User - Read only access to the entire system. |
Email | Email address of the user. |
Slack Notification URL | URL to be used for Slack notifications. Optionally, send a test Slack notification using the  icon. icon.Note: Slack notification URL is specifically a Slack app-based Webhook URL. |
5. Click Update to incorporate your changes.
The existing user is updated.
Delete an Existing User
When you want to remove the user from its physical location, you must delete the user details from the Accounts page.
Prerequisites
• The user is already added to the user accounts.
• You have the permissions/roles to delete an existing user.
Procedure
1. Select the row containing the user account to delete the selected users.
2. In the Action tab, click the Delete icon for the user that you want to delete.
3. In the User Deletion Confirmation dialog box, click Delete to confirm.
The selected users are deleted from the Accounts page.
Note: The default admin user cannot be deleted. This default admin user can be used to create other admin users.
Sessions
The sessions page allows the user to view and manage all the active sessions.
View Sessions
Allows you to view which users are active and when they are logged in.
Prerequisite
The users must be active to be viewed.
Procedure
In the IP Maestro home page, click System Management > User Management > Sessions. The Sessions page is displayed with the details related to the Username, IP address (From IP), Session Start, and Last Access details.
Note: To log out a user from the session, select the user and click the Logout icon.
Alerts
This tab allows you to subscribe to email or slack notification, and select the alert type as alarm or notification.
As an Admin, you can choose an user from the list of registered users in the drop-down, and select the type of alarm or notification that you want to enable for that user. You can also define an URL based destination for the user as a notification type.
This tab contains the following operations:
Email Subscription
Procedure
1. In the IP Maestro home page, click System Management > User Management > Email Notifications. The page is displayed with the list of registered users along with the following details:
Field | Description |
Username | Name of the registered user. |
Email | Email address of the user. |
Subscriptions | Type of email alerts and IP Maestro notification subscribed to. |
Action | Option to Edit or Delete the subscription. |
1. To add a new subscription, click the  icon.
icon.
icon.2. Select the email address for the user that you want to subscribe to email alerts.
3. Click the check-box for the desired Alarm type - Critical, Major, Warning, Minor.
4. Click the check-box for the IP Maestro Notification type.
5. Click Save to save the changes. A pop-up message is displayed to confirm the preferences are saved successfully.
You can edit or delete the subscription using the icons in the Action tab
Note: As a non-admin user, you can go to the Email Notifications tab and check if your email ID is correct. You can select the severity type check-box for which you want to be notified on email.
Slack Subscription
Slack is a cloud based communication platform that has the capability to integrate with many other applications.
Procedure
1. In the IP Maestro home page, click System Management > User Management > Slack Subscription. The page is displayed with the list of registered users when the user has an assigned Slack URL. The following details are shown:
Field | Description |
Username | Name of the registered user. |
Slack URL | URL used for Slack notifications. |
Subscriptions | Type of alert and Slack notification subscribed to. |
Action | Option to Edit or Delete the subscription. |
2. To add a new subscription, click the icon.
icon.3. Select the user from the drop-down to subscribe.
Note: The Slack URL must be previously assigned to the user in the User Management > IP Maestro Accounts tab in order to show in the drop-down list.
4. Click the check-box for the desired Alarm type - Critical, Major, Warning, Minor.
5. Click the check-box for the IP Maestro Notification type.
6. Click Save to save the changes. A pop-up message is displayed to confirm the preferences are saved successfully.
You can edit or delete the subscription using the icons in the Action tab.
Reports
This tab allows you to publish periodic reports based on network activities. It captures and summarizes the various activities and delivers the report via email to the registered email address. These reports are used by network operators to evaluate and act on various network anomalies.
The reporting can be scheduled daily, weekly, or monthly as preferred.
Note: Each user is allowed a single scheduled report.
When adding a new subscription or when editing an existing subscription, one or more of the following reports can be selected to be summarized:
• Device Connection Changes - Detection of Mount and Unmount of devices.
• Device Alarms Summary - Power alerts for CPU, RAM, PSU, Fan, and Transceivers.
• Device Image Changes Summary - Detection of software version change.
• Device License Changes Summary - Detection of license installation.
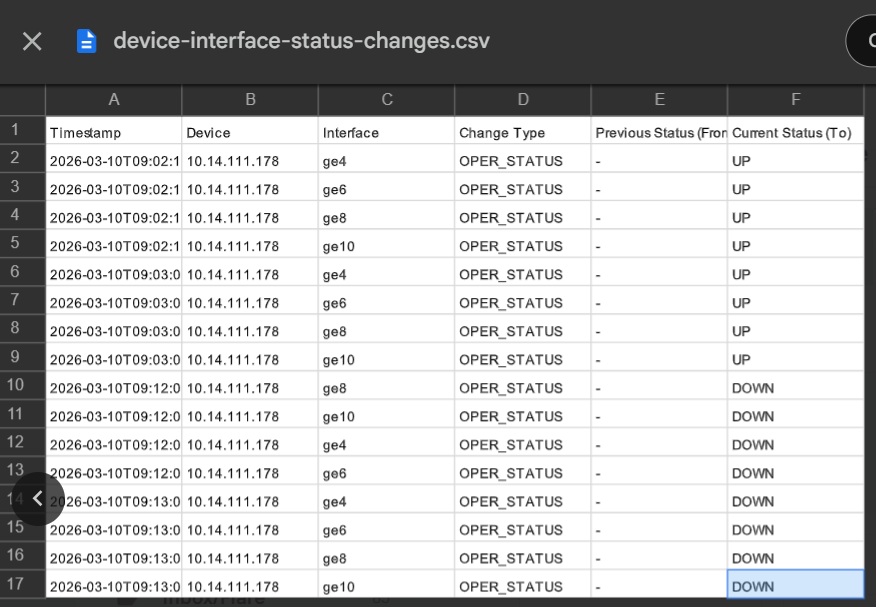
• Device Interface Status Changes - Detection of interface flaps (up/down).
Procedure
1. In the IP Maestro home page, click System Management > User Management > Reports. The page is displayed with the list of registered users with the reporting enabled. The following details are shown:
Field | Description |
Username | Name of the registered user. |
Email | Email address of the registered user. |
Reports | Reports selected to be generated. |
Start Time | Start time of the report generation. |
Last Run Time | Run time of the report generation. |
Last Run Status | Status of the report generation. |
Next Run Time | Next scheduled run time for the report. |
Recurring | Frequency of report generation. |
Action | Option to Edit or Delete the subscription. |
2. To add a new subscription, click the icon.
icon.The Add New Subscription dialog box is displayed, as follows: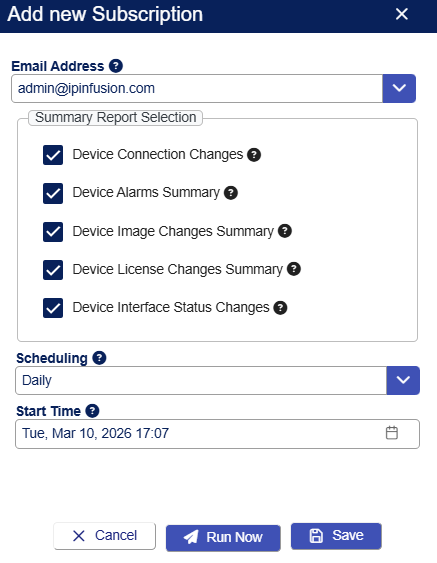
3. In the Email Address field, select the email address to receive the summary report.
4. In the Summary Report Selection, select the desired check-boxes.
5. In the Scheduling drop-down, select the appropriate frequency for scheduling the report.
6. In the Start Time drop-down, select the start date and time for the execution of the first report.
7. Click Save to save the configuration and schedule the report.
Note: You can use the Run Now button for an immediate, one-time run of the summary report.
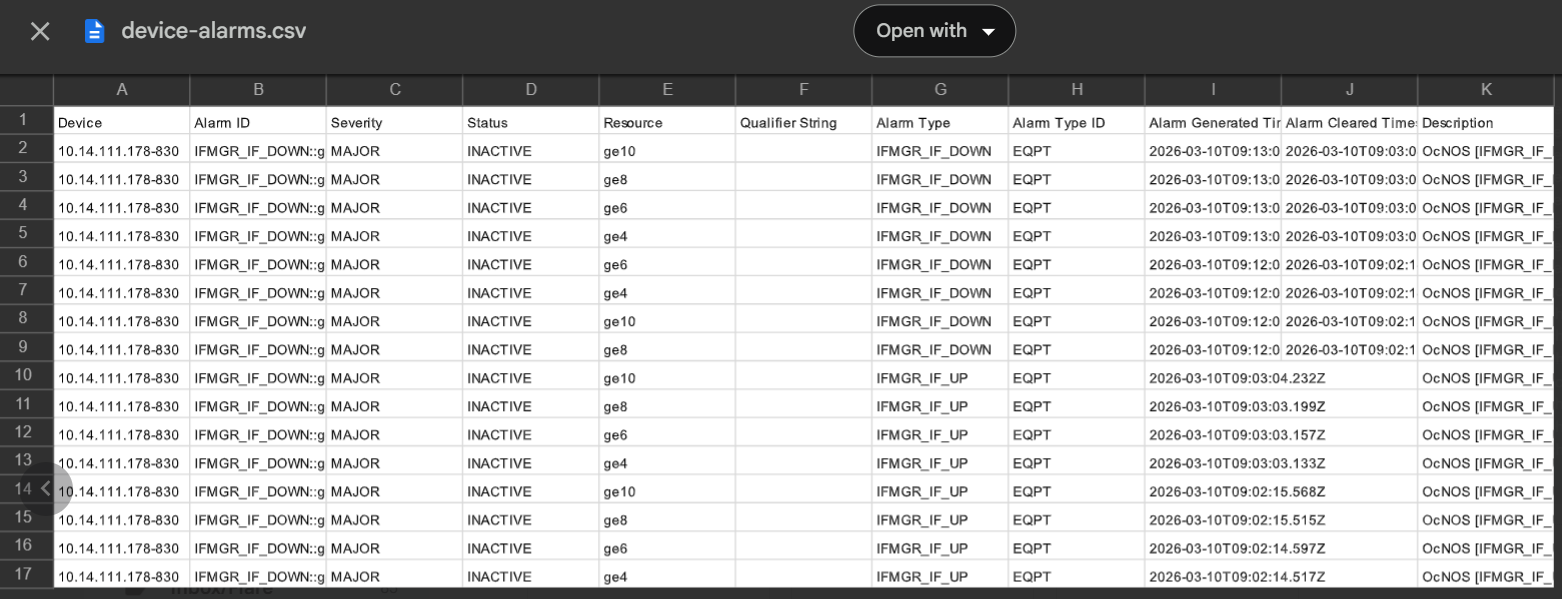
Sample Report sent on email
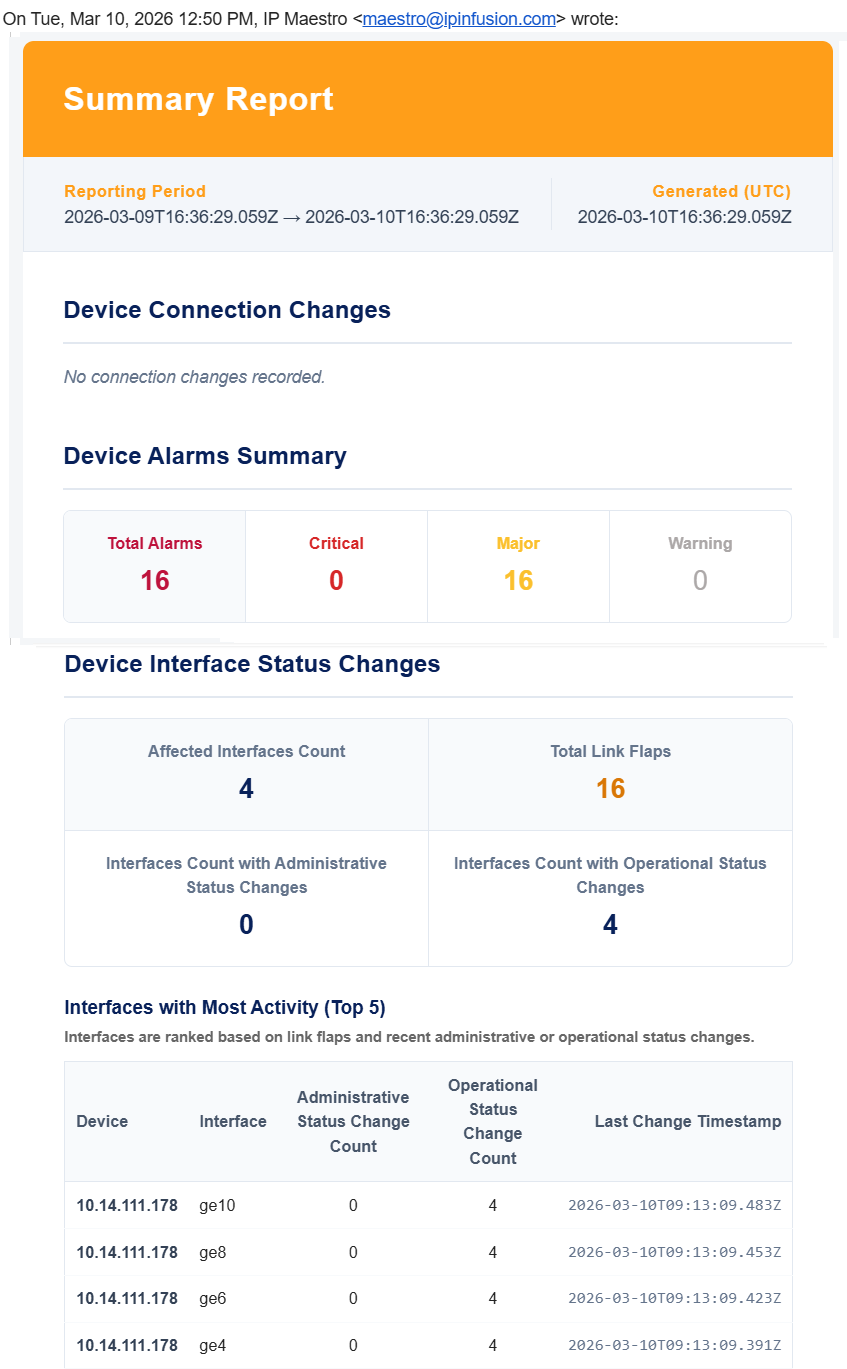
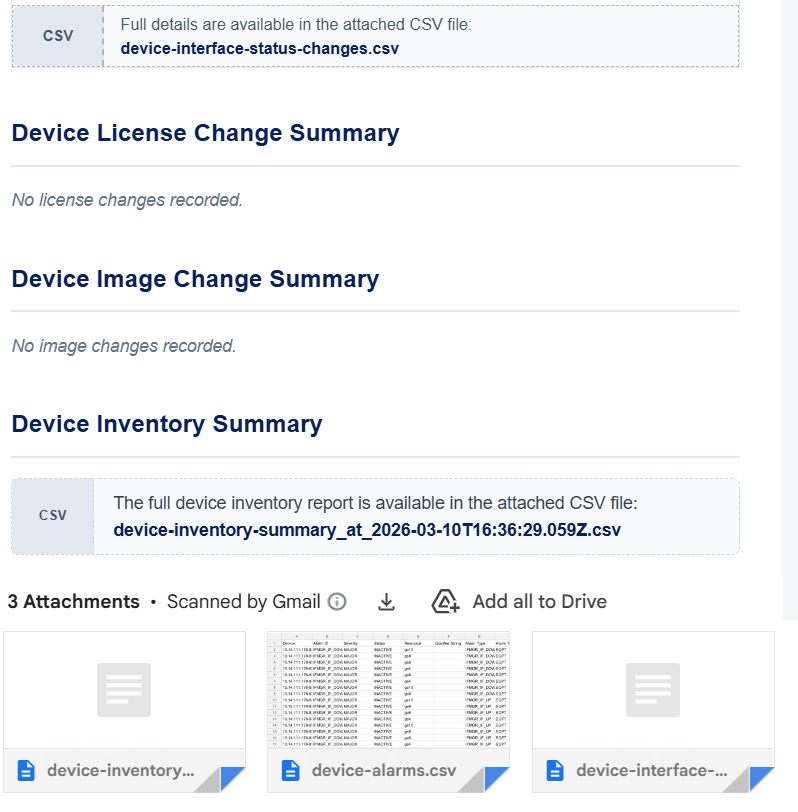
The summary files are attached with the email in downloadable format. Here are the sample attachments:

User Federation
This tab provides support for role-based access control using Lightweight Directory Access Protocol (LDAP) Authentication and Active Directory (AD). IP Maestro user interface leverages the User Federation capabilities of authentication manager to integrate LDAP and AD.
For detailed information on configuration, refer to Appendix section in the IP Maestro Installation Guide.
Create and Manage Providers
The User Federation tab on IP Maestro interface enables administrators to create and manage providers.
To add a new provider, follow the steps mentioned below:
1. In the IP Maestro home page, click System Management > User Management > User Federation.
2. In the User Federation page, click the Add Provider button.
In the Provider Details page that is displayed, enter the details as follows:
Field | Description | Mock LDAP server settings | Comments |
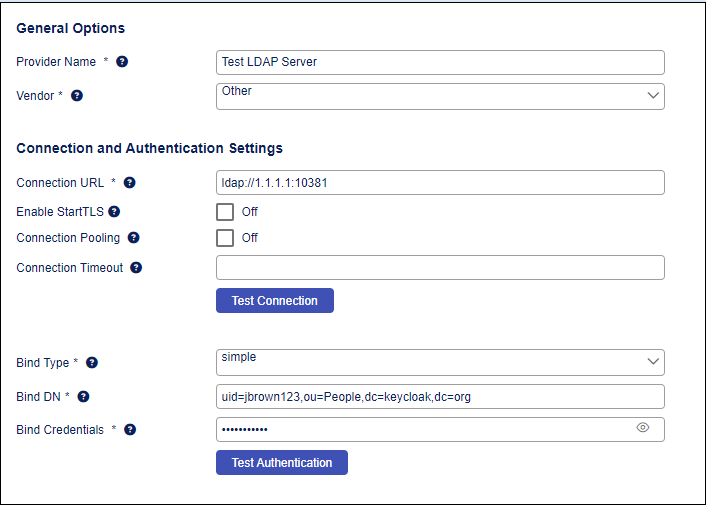
General Options | |||
Provider Name | Enter a display name for the provider | Test LDAP server | Any name to identify the provider. |
Vendor | Type of the LDAP vendor | Other | Mock LDAP server is not a part of AD, hence use “Other”. |
Connection and Authentication Settings | |||
Connection URL | URL to connect to the LDAP server | ldap://<ip-of-server>:port | For example: ldap://1.1.1.1:10381 |
Enable StartTLS | Encrypts the connection to LDAP using StartTLS | Off | Mock LDAP server does not support TLS. |
Connection Pooling | Check box to determine if IP Maestro must use connection pooling for accessing LDAP server. | Off | Connection pooling is not required to access mock LDAP server. |
Connection Timeout | LDAP connection timeout in milliseconds | Off | No connection timeout is specified. |
Test Connection | Button to test the connection | ||
Bind Type | Type of authentication method used during LDAP bind operation. | Simple | If the LDAP server allows anonymous requests, select ‘none'. The mock LDAP server will not accept anonymous requests hence select 'simple’ and pass authentication details. |
Bind DN | Distinguished name of the LDAP admin for IP Maestro to access LDAP server. | uid=jbrown123,ou=People,dc=keycloak,dc=org | Complete DN of the admin user |
Bind Credentials | Password of LDAP admin. | password123 | Password is encrypted and only used to check authentication with LDAP server. |
Test Authentication | Button to test the authentication | ||
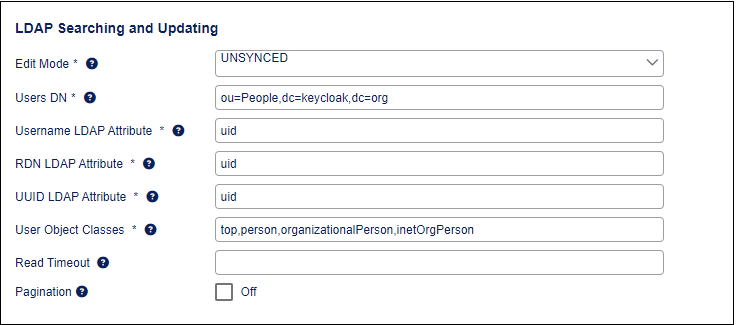
LDAP Searching and Updating | |||
Edit Mode | READ_ONLY - Read-only LDAP store. UNSYNCED - Imports User data without syncing back to LDAP. | UNSYNCED | Recommended to select edit mode as UNSYNCED so that the basic information of users will be imported to IP Maestro and cached. |
Users DN | Parent distinguished name of LDAP users. It is the name of the LDAP tree where the users are stored. | ou=People,dc=keycloak,dc=org | Name of the LDAP tree where users are present. |
Username LDAP Attribute | LDAP attribute that is stored as IP Maestro user name | uid | The attribute in the mock LDAP server which defines the username of the users. |
RDN LDAP Attribute | Name of LDAP attribute used as Relative Distinguished Name (RDN) of typical user | uid | Same as user name attribute. |
UUID LDAP Attribute | LDAP attribute used as unique object identifier for objects in LDAP. | uid | Same as user name attribute. |
User Object Classes | LDAP object class attribute values for users, separated by commas | top, person, organizationalPerson, inetOrgPerson | Object classes defined for users in the mock server. |
Read Timeout | LDAP read timeout in milliseconds that apply to read operations | Read timeout values not configured. | |
Pagination | Check-box to determine if LDAP server supports pagination | Off | The mock server does not support pagination. |
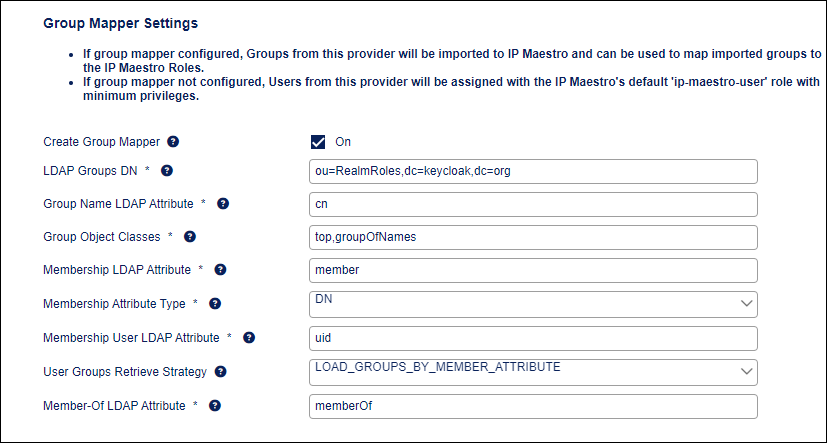
Group Mapper Settings | |||
Create Group Mapper | Check-box to create LDAP mapper | On | Group-mapper will be created |
LDAP Groups DN | Distinguished name of LDAP where the groups of the tree are saved. | ou=RealmRoles,dc=keycloak,dc=org | Tree where groups are defined in the mock server. |
Group Name LDAP Attribute | Name of LDAP attribute in group objects and Relative Distinguished Name (RDN) of group | cn | This defines the name of the group in the mock LDAP server. |
Group Object Classes | LDAP object class of the group object, separated by commas | top, groupOfNames | These are the 2 object classes defined in the server. |
Membership LDAP Attribute | Name of LDAP attribute on group used for membership mappings | member | |
Membership Attribute Type | • DN - The LDAP group has members declared in the form of full distinguished name. • UID - The LDAP group has members declared in the form of user ID. | DN | |
Membership User LDAP Attribute | Enter if the membership attribute type is UID | uid | |
User Groups Retrieve Strategy | Specifies how to retrieve groups of users: • LOAD_Groups_BY_MEMBER_ATTRIBUTE - Roles of users are retrieved by sending LDAP query for all groups where ‘member’ is our user. • GET_GROUPS_FROM_USER_MEMBEROF_ATTRIBUTE - Groups of users are retrieved from ‘memberOf’ attribute of our user. | LOAD_Groups_BY_MEMBER_ATTRIBUTE | |
Member-of LDAP Attribute | Used only when the User Roles Retireve Strategy is GET_GROUPS_FROM_USER_MEMBEROF_ATTRIBUTE. The default value is ‘memberOf’. | memberOf | This is default value as it is not needed for mock LDAP server since retrieve strategy is LOAD_Groups_BY_MEMBER_ATTRIBUTE |
The configurations that are provided enable IP Maestro to connect to the LDAP server, allowing users from the LDAP server to log in to Maestro upon successful authentication.
Here are a few images of the mock LDAP server configurations that have been added in the IP Maestro user interface.
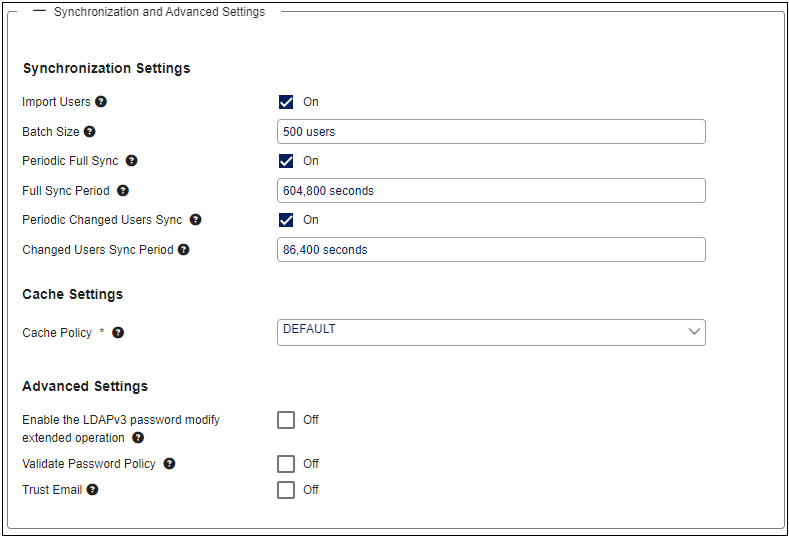
It is recommended to retain the Synchronization and Advanced Settings as provided below:
Map Roles
To map LDAP group/user role to a relevant role in IP Maestro, follow the procedure mentioned below:
1. In the IP Maestro home page, click System Management > User Management > User Federation.
2. In the User Federation page, click the Map Role(s) button.
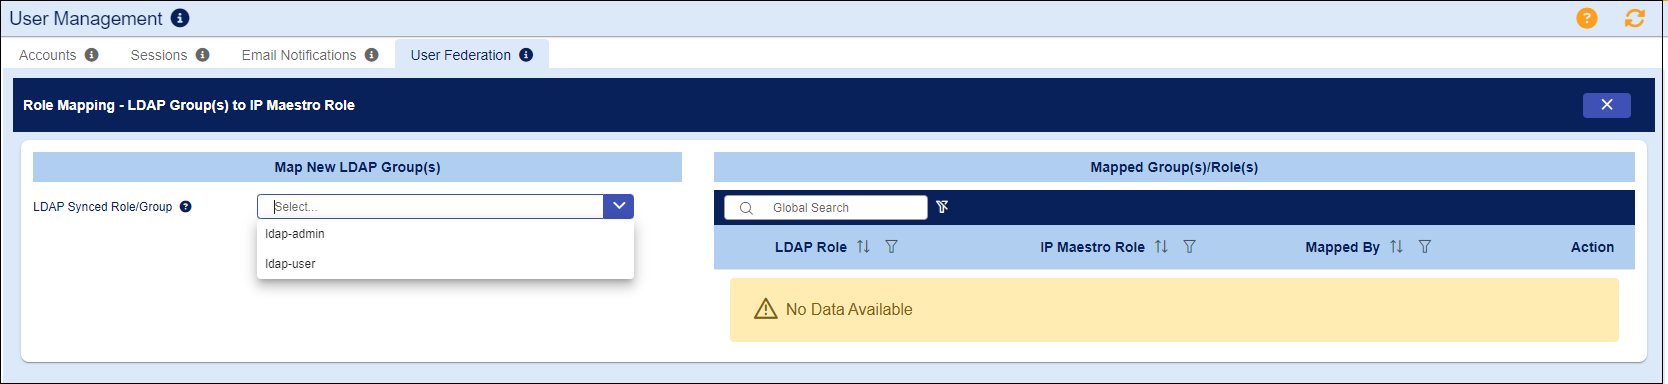
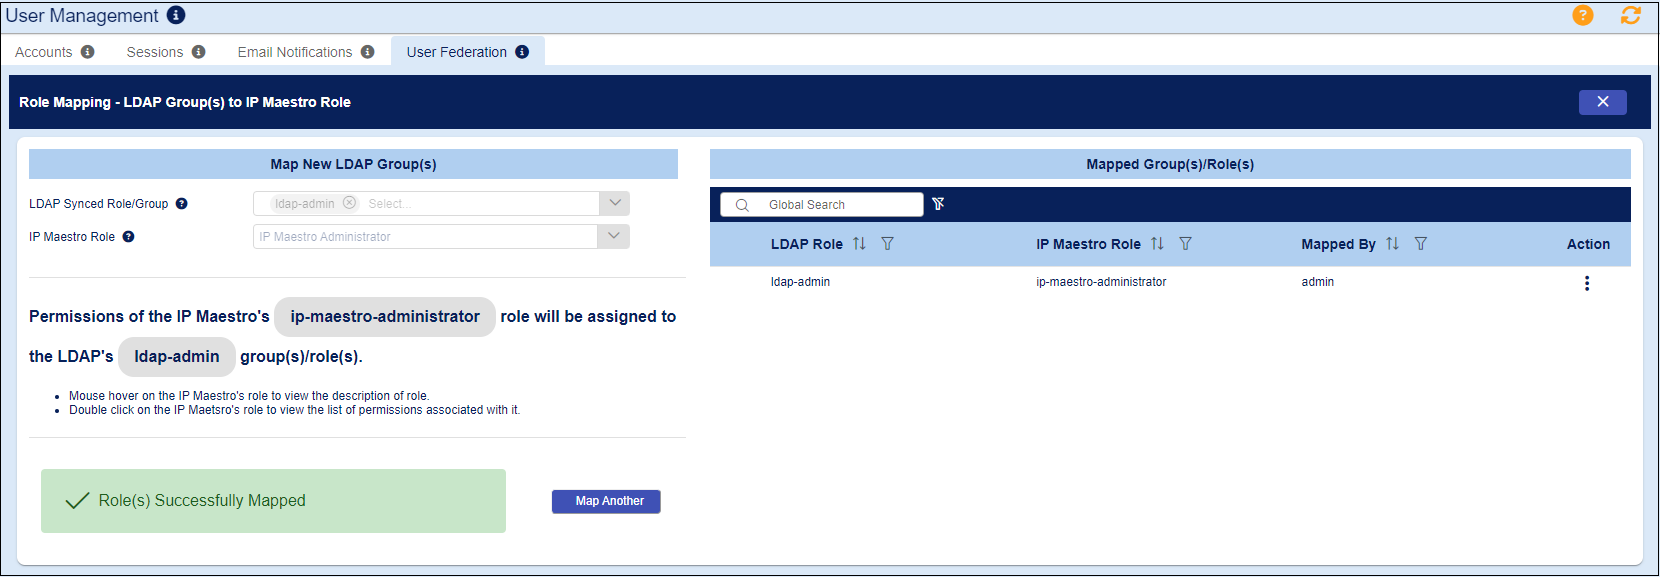
3. In the Role Mapping page that is displayed, follow the steps shown below:
Note: If group mapper is created, the groups/roles from the LDAP server will be imported to IP Maestro as per configurations and will be available to map.
• In the LDAP Synced Role/Group drop-down menu, select the groups/roles that are needed to be mapped to IP Maestro role.
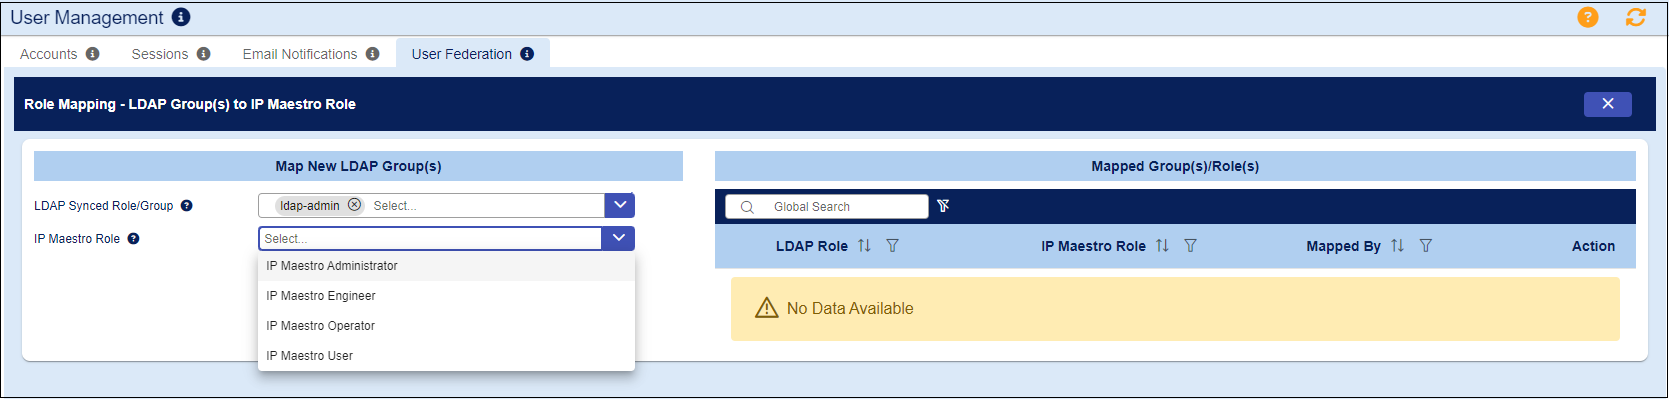
• From the IP Maestro Role drop-down menu, select IP Maestro role.
• After selecting the appropriate roles, the mapping details are displayed.
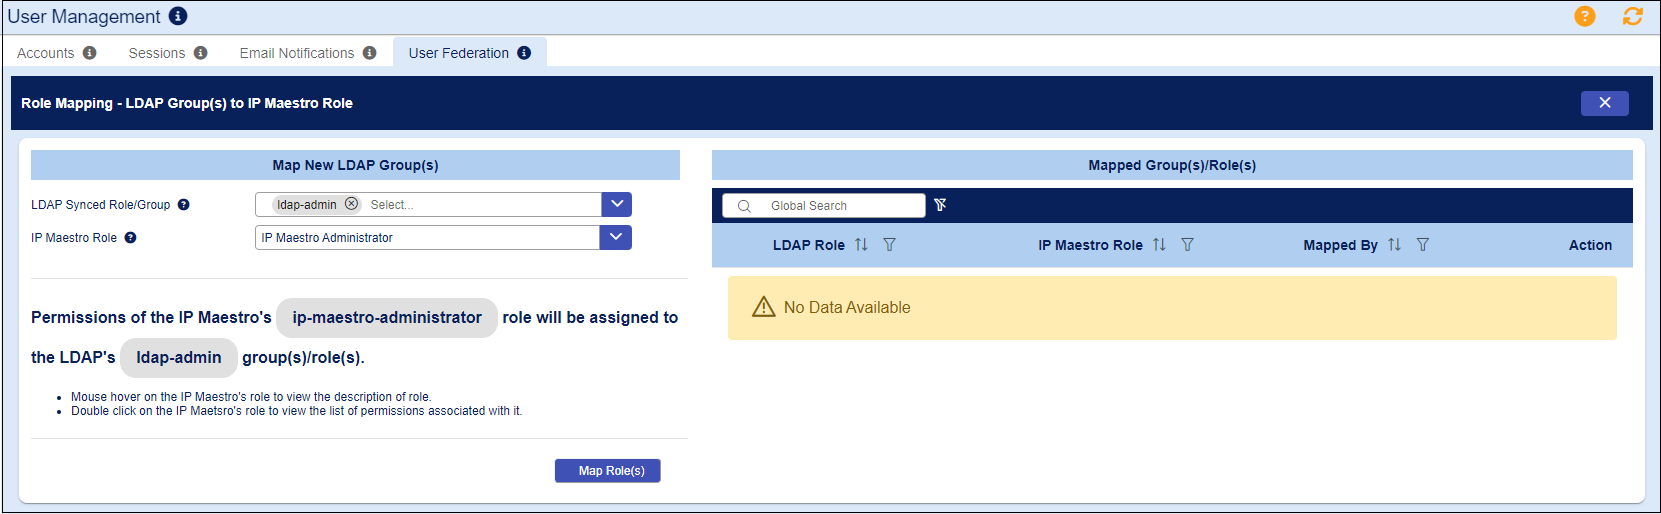
• Click the Map Role(s) button to confirm the mapping.
The mapped roles are displayed in the Mapped Group(s)/Role(s) table and can be modified or deleted using the Action button.
After successful authentication, users from the configured provider will be granted access to IP Maestro and their roles will be assigned based on the role mappings. The user roles can also be validates under System Management > User Management > Accounts tab.
Note: If no mappings are done, the LDAP users are allowed to login with the default IP Maestro User role assigned to them.
Manage Preferences
The Preferences page helps you to define system-wide parameters like license repository and image repository. These global parameters are initially configured during the deployment of IP Maestro.
Note:
• The image and license repository path names can be modified to accommodate field requirements.
• The Configuration Push Parameters are defined during initial installation and cannot be modified using the portal.
This page allows the following operations:
Configure System Preferences
The configuration process allows you to specify the IP address of the license server, or to define the location of the repository of the licenses and images for managing the system in the Licenses and Image Upgrade sections under the Device Management menu.
Note:
For more information on licenses and images, refer to the Edit the License Installation Progress and Upgrade New Image sections.
Procedure
1. In the IP Maestro home page, click System Management > Preferences > System.
2. Under IP Maestro Licensing field, enter the following details:
Field | Description |
License Server | IP address of the License Server to obtain license to IP Maestro. |
Acquire License | Button to acquire the license. |
The status of the license, with device numbers is displayed at the right.
The Release License button is used to release the previously acquired license. Note that the devices must be unmounted before releasing the license.
1. Under Device Repositories, specify the URL details as follows:
Field | Description |
License Repository | Path name used to access the device licenses repository provided by the user. |
Image Repository | Path name used to access the device images repository provided by the user. |
2. Click Save to save your changes.
Configuration Push Parameters
The Configuration Push Parameters that are defined during initial installation are displayed. Note that the parameters cannot be modified here.
Field | Description |
Push Configuration for LLDP | Allows IP Maestro to push the LLDP configuration. |
Push Configuration for Alarms | Allows IP Maestro to enable Fault Management Services on a device. |
Push Configuration for Syslog | Allows IP Maestro to push the Syslog configuration. |
Database Management
The Backup Database feature allows to export the backup of the entire IP Maestro database. It provides a solution to restore the Maestro network configuration in the event of hardware failure or corrupted database.
To download the backup zip file, follow the steps mentioned below:
1. In the IP Maestro home page, click System Management > Preferences > System.
2. In Database Management section, click the Backup button.
This opens the Database Archive File dialog box which displays the newly backed up zip file that is ready to be downloaded.
3. Click Submit to download the files. The archive is generated with the date-time stamp and then downloaded into the Downloads folder.
Restoration
Restoration is a script based feature with a set of steps to be followed by an admin user with Linux privileges.
WARNING: Perform the Restore operation only when absolutely necessary.
Note: These instructions require that you essentially 'down/stop' IP Maestro for a short period of time.
1. Log in to the Maestro controller via Linux shell into the NSMO directory. You can reinstall Maestro, if necessary.
2. Copy the associated archive file (from the Downloads folder) to the local NSMO directory.
3. In the script file postgresRestoreFromZip.sh (located in ./bin dir) enter the command:
sudo bash ./postgresRestoreFromZip.sh <path_to_zip_file> to repopulate the Maestro database.
The Restore script takes the archive file name as an input parameter and populates the Maestro database from its contents.
Note: While performing a restore, to prevent database locking you must ensure all docker containers are stopped except the postgres server (ipi-postgres). This is to ensure no database contention is caused by other docker containers.
Configure DHCP
Dynamic Host Configuration Protocol (DHCP) is a client/server protocol. It automatically provides an Internet Protocol (IP) host with its IP address and other related configuration information. For example, it provides the subnet mask and default gateway.
Procedure
1. In the IP Maestro home page, click System Management > Preferences > DHCP.
2. In the DHCP tab, enter the following details:
Field | Description |
• Form View • File Editor | • Displays the form view with the options mentioned below. • Displays the file editor. |
Interface | The physical interface of the server on which the DHCP server needs to listen when serving DHCP requests. |
DHCP Configuration | |
Default Lease Time | Specifies the duration in seconds for which DHCP clients will retain the assigned IP address (e.g., default-lease-time 86400 sets the lease time for 24 hours). |
Maximum Lease Time | Specifies the maximum duration in seconds for which DHCP clients can retain the assigned IP address before they must renew the lease or request a new IP address (e.g., max-lease-time 7200 sets the maximum lease time to 7200 seconds or 2 hours). |
Subnet | Defines a subnet with its network address pool. |
Subnet Mask (or netmask) | Specifies the subnet mask, which determines the network portion and host portion of an IP address within the subnet. |
Range Start | Start IP for the IP address range within the subnet that can be assigned to DHCP clients. |
Range End | End IP for the IP address range within the subnet that can be assigned to DHCP clients. |
Routers | Specifies the IP address of the default gateway (router) that DHCP clients must use for internet access. |
Domain Name Server | Sets the IP address of the Domain Name System (DNS) server that DHCP clients must use for domain name resolution. |
License Server | Specifies the URL to obtain a valid software license file for the device. |
License Folder | Specifies the URL of the software license folder to obtain a valid software license file for the device. |
Image Location | Specifies the URL to obtain a valid OcNOS image to be loaded to the device. |
Day Zero Configuration | Specifies the URL to obtain a valid day-0 configuration file to be applied to the device. |
3. Click Save to save your changes.
You can click Stop to stop the server or Restart to restart the server.
Configure SMTP
Simple Mail Transfer Protocol (SMTP) is an Internet standard communication protocol for e-mail transmission. In order to have email notifications enabled on IP Maestro, the SMTP server must be configured.
Procedure
To configure SMTP server, follow the steps below:
1. In the IP Maestro home page, click System Management > Preferences > SMTP.
In the SMTP tab, enter the following details:
Field | Description |
From | From address email ID |
From Display Name | A user-friendly name for the ‘From’ address |
Reply to Display Name | A user-friendly name for the ‘Reply to’ address |
Host | SMTP Mail server host IP |
Port | SMTP Mail server port |
2. Click the Test Connection button to test the SMTP connection. A pop-up message is displayed to show if the connection is successful or not. This also triggers a test mail to the e-mail address of the logged-in admin user.
3. Click Save to save the SMTP configuration.
This configuration is necessary for enabling e-mail alerts to users. As an admin, you can configure subscription to e-mail alerts, notifications and alarms for other users. For more details, refer the section Alerts.
Configure Dashboard Level Preferences
The user persistence feature in IP Maestro provides the ability to render the dashboards and other settings, based on the assigned preferences data. This feature also detects the changes to the dashboards or other preferences and these changes are persisted in the database.
The Dashboards tab allows you to configure dashboard level preferences for different types of roles.
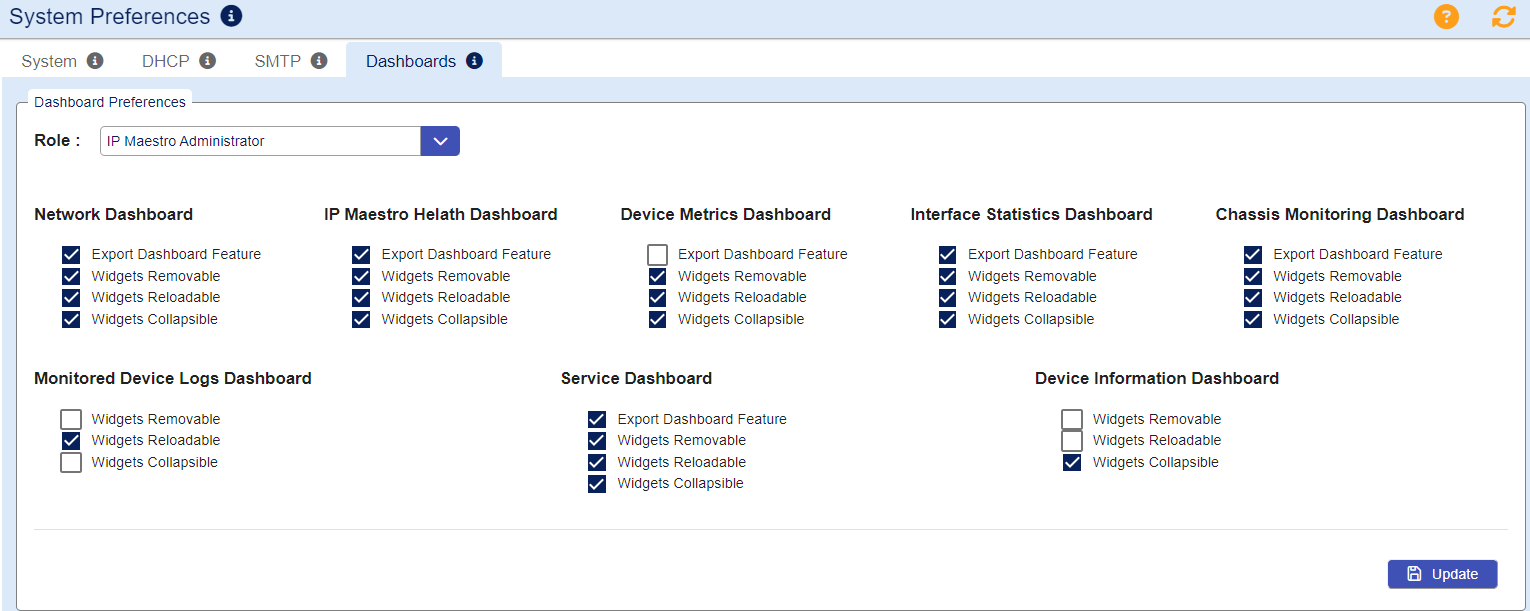
Configure Preferences
As an administrator, you can assign default preferences to user accounts based on particular roles in IP Maestro as follows:
1. In the IP Maestro home page, click System Management > Preferences > Dashboards.
2. In the Role drop-down field, select the role for which you want to assign the preferences.
3. Select the check-boxes for the desired features you want to be displayed for each dashboard.
4. Click Update to save the preferences.
Note: Whenever an user account is deleted from IP Maestro, the preferences are also removed.
View IP Maestro Health
The IP Maestro Health page allows you to monitor the system health of the overall IP Maestro domain controller.
The following list provides details on key features of IP Maestro Health:
Field | Description |
 | Reloads the data in the Health tab. |
 | Collapses (minimizes) the details. Click again to show the details. |
 | Removes the widget from the screen. |
 | Exports the data in PDF format. |
 | Displays data according to the date range. |
 | Allows to display data based on the following settings: • Quick Selection - displays data according to the selected input. • Date Time Picker - displays data according to the specified date range. • Auto refresh - if enabled, data is refreshed as per the specified time interval. • Dashboard color scheme - you can choose the color scheme to display the dashboard. • Manage Widgets - you can choose the widgets to be displayed on the dashboard. |
Prerequisites
Ensure that the configured devices (through the device registration process) are available.
Procedure
In the IP Maestro home page, navigate to System Management > IP Maestro Health.
The Health dashboard is displayed with the following information:
Field | Description |
|---|---|
Status Summary | Provides an overview of the internal IP Maestro applications as a container. It shows the container name, image specification, and its running time. |
Containers | Shows the containers information such as name, status, and image name. |
Statistics | Lists the internal IP Maestro applications as containers along with the statistics for each container. It displays the following information: • Container Name • CPU Usage (%) • Memory Usage (%) • Memory Usage • Memory Limit • Total Net Inbound • Total Net Outbound |
Memory Usage | Displays the overall Memory usage for the IP Maestro system. |
CPU Usage | Displays the overall CPU usage for the IP Maestro system. |